I have just released my second app called Targetboard Grids and I was surprised by how easy it was to do this time. All I needed to know was how to make a simple table in HTML and fill it in with numbers or letters. Add a splash of colour and it was ready to go to market. In this article, I’m going to show you how to make a really simple app that shows a teacher’s class timetable.
While I don’t think this is a great idea for an actual app to put on marketplace, you might be able to use it on your own phone as a web app. You might have a couple of ideas of how to utilise this idea for some other project.
What you need:
- A HTML editor or Microsoft Word
- An Appmakr.com account
- A compression program like WinZip
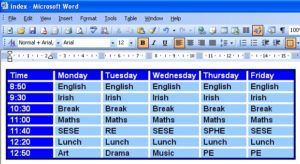
I’m going to use MS Word as it’s probably the easiest to work with. It’s important to make sure that when you start a new document that you click, New Web Page.

I need to make a table that will fit in times and the days so I’ll need 6 columns and I’ll start with 8 rows. Obviously, you tailor this to your own needs.

Once you’ve filled in the subjects and times, it’s time to make it look nice. There’s two ways you can do this. You can save the file as it is now and then do some coding in CSS. However, in this tutorial I’m going to simply edit the table to make it look the way I like. I do this by right-clicking on the table and selecting the Borders and Shading option. Once I’ve changed my colours, I can change font sizes and colours too.

It’s now time to save your table. Click on File -> Save As and make sure to save your file as “index.html” and as a web page. You can check to see if this has worked by closing Word and finding the file you’ve saved. Double-click on the file and it should open in your web browser.
We need to port it over to become an app. Go to the web site, http://www.appmakr.com, and get yourself an account. When you register, you’ll need to create a new app so click on the Create a New App button.

You’ll have the option of creating an iPhone or an Android app. It doesn’t really matter what you choose but the iPhone version has a better simulator to see what your app looks like so we’ll choose this. You’ll be given the option of adding an RSS Feed to start off but we’ll skip this.
At this stage, we need to give our app a name and put in some artwork. I’m going to skip all this and go directly to the “Tabs” section because this is where we’re going to add in our timetable.

Before we add anything, we will need to compress our index.html file and give it a decent name. You can use compression software to do this. I like 7-zip but anything will do. Once the file is compressed, I usually change the compressed filename to something readable like “ttable”

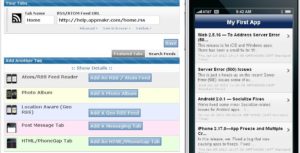
Back in Appmakr, click on the Add An HTML/PhoneGap Tab button. Choose an appropriate icon. You’ll see a green bar appear above with the word “html” in a white box. Change this to “Timetable.”
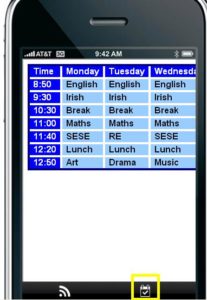
Click “Choose File” and select your compressed file. Then click Upload. Within a couple of seconds, a greyed out box should have the text: C:fakepathXXXX.zip depending on what you called the file. Have a look at the iPhone simulator to the side now. Click on the icon that you chose and your timetable will be there!
In my example, I can see Monday to Wednesday but I can scroll across to the right to see the rest. (As I said, this idea of a timetable is probably not the best one!)
You’ll need to delete the default “Home” RSS feed from the list of tabs or you’ll have an RSS feed from AppMakr on your timetable app. Click Save and you’re almost there.
You can now go through the rest of the tabs, adding images, headers, etc. Once you’re done you can go to the Publish tab and set yourself up with a developer ID.
I’m afraid after that, you’re on your own! It costs $25 to be an Android developer or $99 for an Apple one every year. Both stores have their own unique instructions as to how to get your app online. Android makes it very easy, which means that your app could be in the Marketplace in a couple of hours. The downside is that there are a lot of apps that are in the Marketplace that might cause issues to your phone in the wrong hands as Google don’t operate an approval system.
To get your app up on the Apple AppStore, requires a load of steps, each more confusing than the last! You’ll also need a Mac computer. Once you get through the steps, there’s still no guarantee that it will be accepted by Apple. For example, I would be surprised if this one got through!
So there you have it, a simple way to get you started with developing apps and the rest is up to your imagination.


0 thoughts on “Make an App”
Very informative article, thanks for sharing. Will definitely check Appmakr apps and create my own schedule for the week.
Thanks for your kind comment Carlyn
Thanks for lining this out so clearly Simon, I suspect my students are going to like trying this! (me too!)
Thank you for a very practical guide to creating an app Simon.
Robin Barnes
You’re very welcome Robin. Thanks for the kind wishes